M1 Mac 세팅하는 과정을 정리했습니다. 중간 중간 겪은 어려움과 해결법까지 정리했습니다.
XCode 설치하기
-
XCode 설치하기
xcode-select --install -
SDKROOT경로.zsrhc추가echo 'export SDKROOT="/Applications/Xcode.app/Contents/Developer/Platforms/MacOSX.platform/Developer/SDKs/MacOSX.sdk"' >> ~/.zshrc
오류 해결하기
1번 과정에서 xcode-select: error: command line tools are already installed, use "Software Update" to install updates 오류가 발생해서 아래 방법으로 해결했습니다.
-
Old Tool을 제거합니다.
sudo rm -rf /Library/Developer/CommandLineTools -
다시 설치합니다.
xcode-select --install
Homebrew 설치하기
Intel 버전 (M1에서 작동 X)
-
Homebrew 접속해서 스크립트를 복사하고 터미널을 열어 실행합니다.
# bash /bin/bash -c "$(curl -fsSL https://raw.githubusercontent.com/Homebrew/install/HEAD/install.sh)" -
제대로 설치되었는지 확인하면서, 업데이트를 합니다.
 # bash
 brew update
M1 버전
Intel 방법으로 설치하면 업데이트시 brew를 찾을 수 없다고 나옵니다.
zsh command not found brew
-
아래 방법을 이용해 설치할 수 있습니다.
# We'll be installing Homebrew in the /opt directory. cd /opt # Create a directory for Homebrew. This requires root permissions. sudo mkdir homebrew # Make us the owner of the directory so that we no longer require root permissions. sudo chown -R $(whoami) /opt/homebrew # Download and unzip Homebrew. This command can be found at https://docs.brew.sh/Installation. curl -L https://github.com/Homebrew/brew/tarball/master | tar xz --strip 1 -C homebrew # Add the Homebrew bin directory to the PATH. If you don't use zsh, you'll need to do this yourself. echo "export PATH=/opt/homebrew/bin:$PATH" >> ~/.zshrc -
터미널을 재실행하거나, 쉘 설정을 업데이트합니다.
source ~/.zshrc -
제대로 설치되었는지 확인하면서, 업데이트합니다.
# bash brew update -
Homebrew dependency 설치합니다.
brew install libjpeg openblas openssl readline sqlite3 xz zlib
응용프로그램 설치하기
Homebrew를 이용해서 응용프로그램을 설치할 수 있습니다.
-
cask라는 것을 설치한다.brew install cask -
Iterm2, Slack, Chrome, VSCode, spectacle, keepingyouawake, karabiner-elements를 설치한합니다.
brew install --cask iterm2 slack google-chrome visual-studio-code spectacle keepingyouawake karabiner-elements
- spectacle [맥에서 이중창 하기]
- keepingyouawake [맥 꺼짐 방지]
- *karabiner-elements [커맨드로 한영 전환 하기] 참고 자료
주의
M1에서 cask를 이용해 설치한 프로그램은 Intel 버전입니다.

개발환경 설치하기
zsh
(M1부터 또는 Big Sur 부터 zsh이 기본 세팅입니다. 생략가능)
brew install zsh
zsh - oh-my-zsh
더 편리한 터미널을 만들어 줍니다. 참고 자료
oh-my-zsh 설치시 ~/.zshrc를 새롭게 생성합니다. (주의!!)
sh -c "$(curl -fsSL https://raw.githubusercontent.com/robbyrussell/oh-my-zsh/master/tools/install.sh)"
pyenv 설치 & 세팅하기
(현재 아래 방법대로 M1에서 설치하고, numpy 설치를 못 하고 있습니다.)
파이썬 버전 관리를 쉽게 합니다. 참고 자료
-
brew를 이용해 설치합니다.
brew install pyenv pyenv-virtualenv -
~/.zshrc를 열어 경로를 추가합니다.vim ~/.zshrc아래 내용을 추가합니다.
export PATH="$HOME/.pyenv/bin:$PATH" eval "$(pyenv init -)" eval "$(pyenv virtualenv-init -)" -
파이썬 3.8.6를 설치합니다.
pyenv install 3.8.6 -
설치한 버전을 바탕으로 환경을 만듭니다.
pyenv virtualenv 3.8.6 env
numpy 설치하기
다음 포스트 M1 Mac python 환경 구성하기 - numpy 참고 부탁드립니다.
오류 해결하기
3번 과정에서 이런 오류가 나서
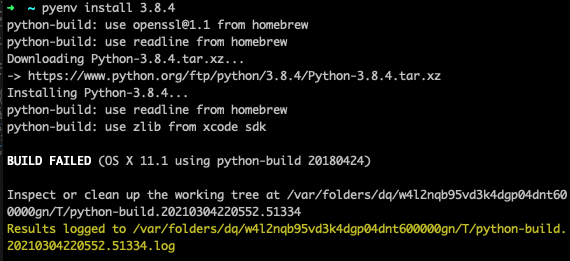
➜  ~ pyenv install 3.8.4
python-build: use openssl@1.1 from homebrew
python-build: use readline from homebrew
Downloading Python-3.8.4.tar.xz...
-> https://www.python.org/ftp/python/3.8.4/Python-3.8.4.tar.xz
Installing Python-3.8.4...
python-build: use readline from homebrew
python-build: use zlib from xcode sdk

BUILD FAILED (OS X 11.1 using python-build 20180424)

Inspect or clean up the working tree at /var/folders/dq/w4l2nqb95vd3k4dgp04dnt600000gn/T/python-build.20210304220552.51334
Results logged to /var/folders/dq/w4l2nqb95vd3k4dgp04dnt600000gn/T/python-build.20210304220552.51334.log
아래로 해결했습니다.
pyenv install --patch 3.8.6 <<(curl -sSL https://raw.githubusercontent.com/Homebrew/formula-patches/113aa84/python/3.8.3.patch\?full_index\=1)
git 설치하기
-
brew를 이용해 설치합니다.
brew install git -
config 설정합니다.
 git config --global user.name "LEEMINJOO"
 git config --global user.email "leeminjoo@example.com"